3. Register a Device
After signing in to the platform next step is to register a device. Registering a device install the Loc.ai:Link agent on your target machine and connects it to your Control platform account. Once registered, the device will appear in your dashboard, receive model deployments, and report telemetry and inference results.
If you are setting up a new account, the Setup Wizard walks you through naming a device, picking a platform, installing the agent, and deploying a model in one place. The manual steps below are always available, and you can add more devices this way at any time.
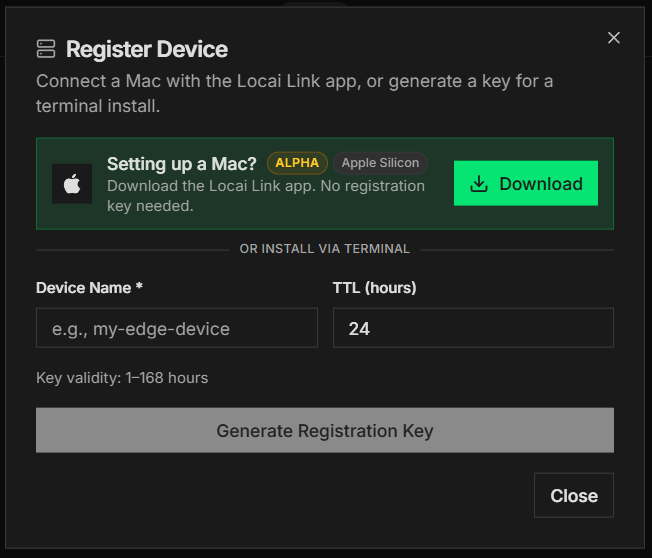
The Register Device dialog has a Setting up a Mac? row at the top. Click Download to get the Loc.ai:Link app (Apple Silicon, Alpha) — its Setup Assistant registers your Mac automatically, so there is no key to generate. The terminal steps below live under the OR install via terminal divider in the same dialog. See Install on macOS for the full walkthrough.
Steps to Register a Device
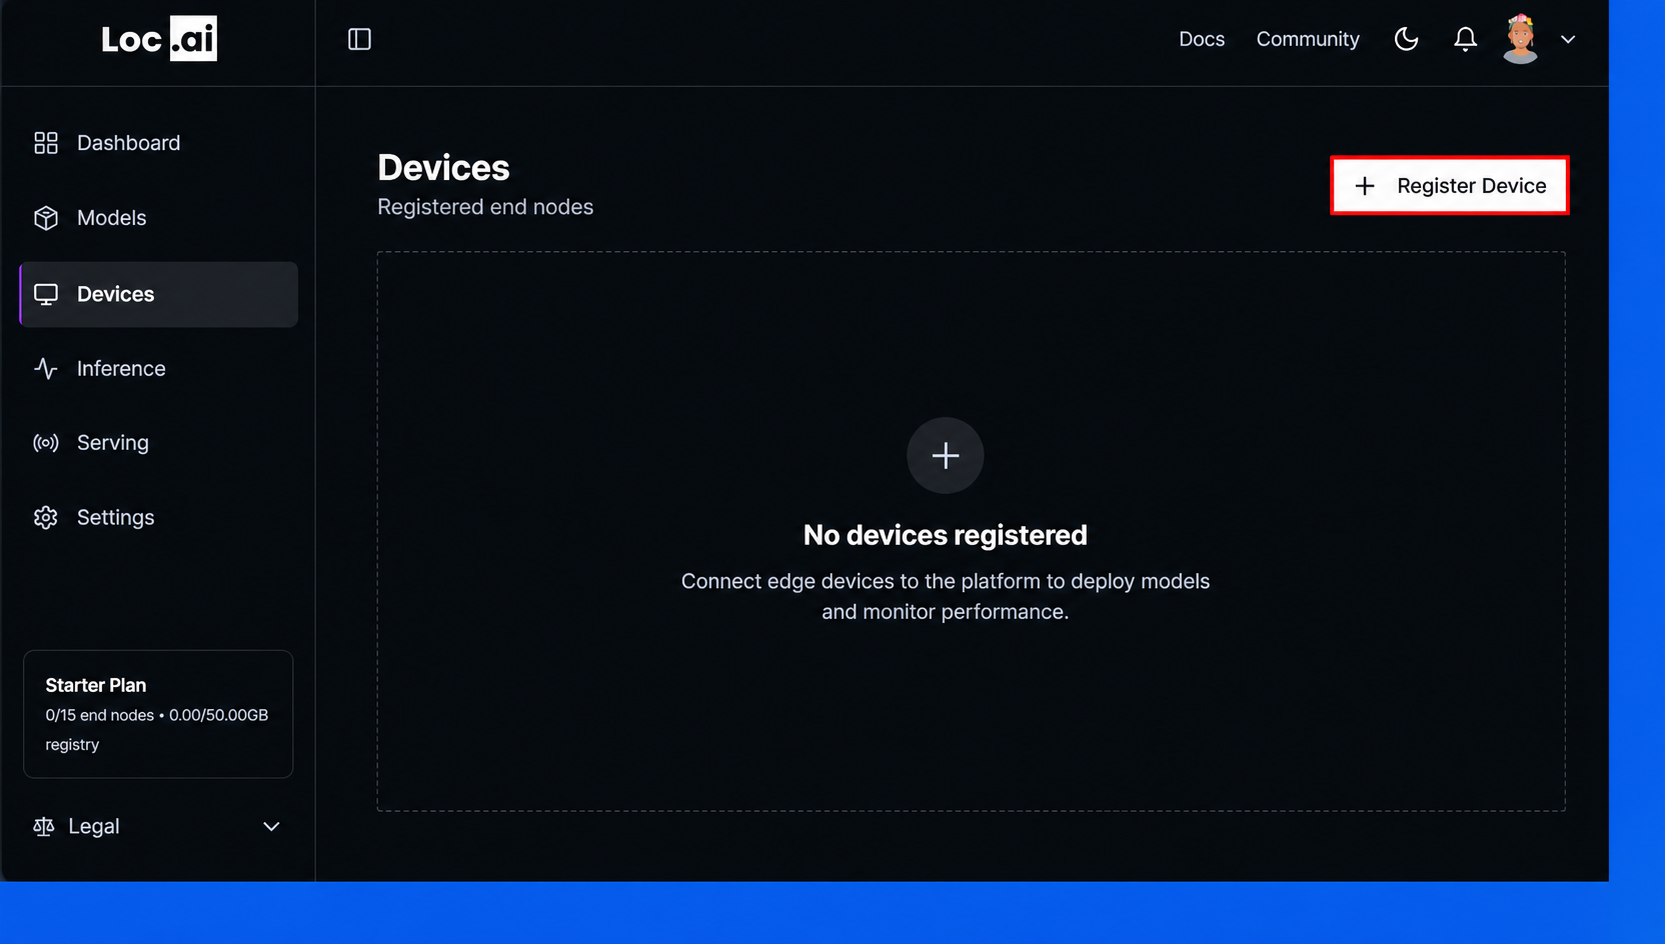
Step 1: From the dashboard, click Register Device button to add a new device and connect it to the Loc.ai platform.

Step 2: On the Devices page, click + Register Device button to start adding a new device to the platform.
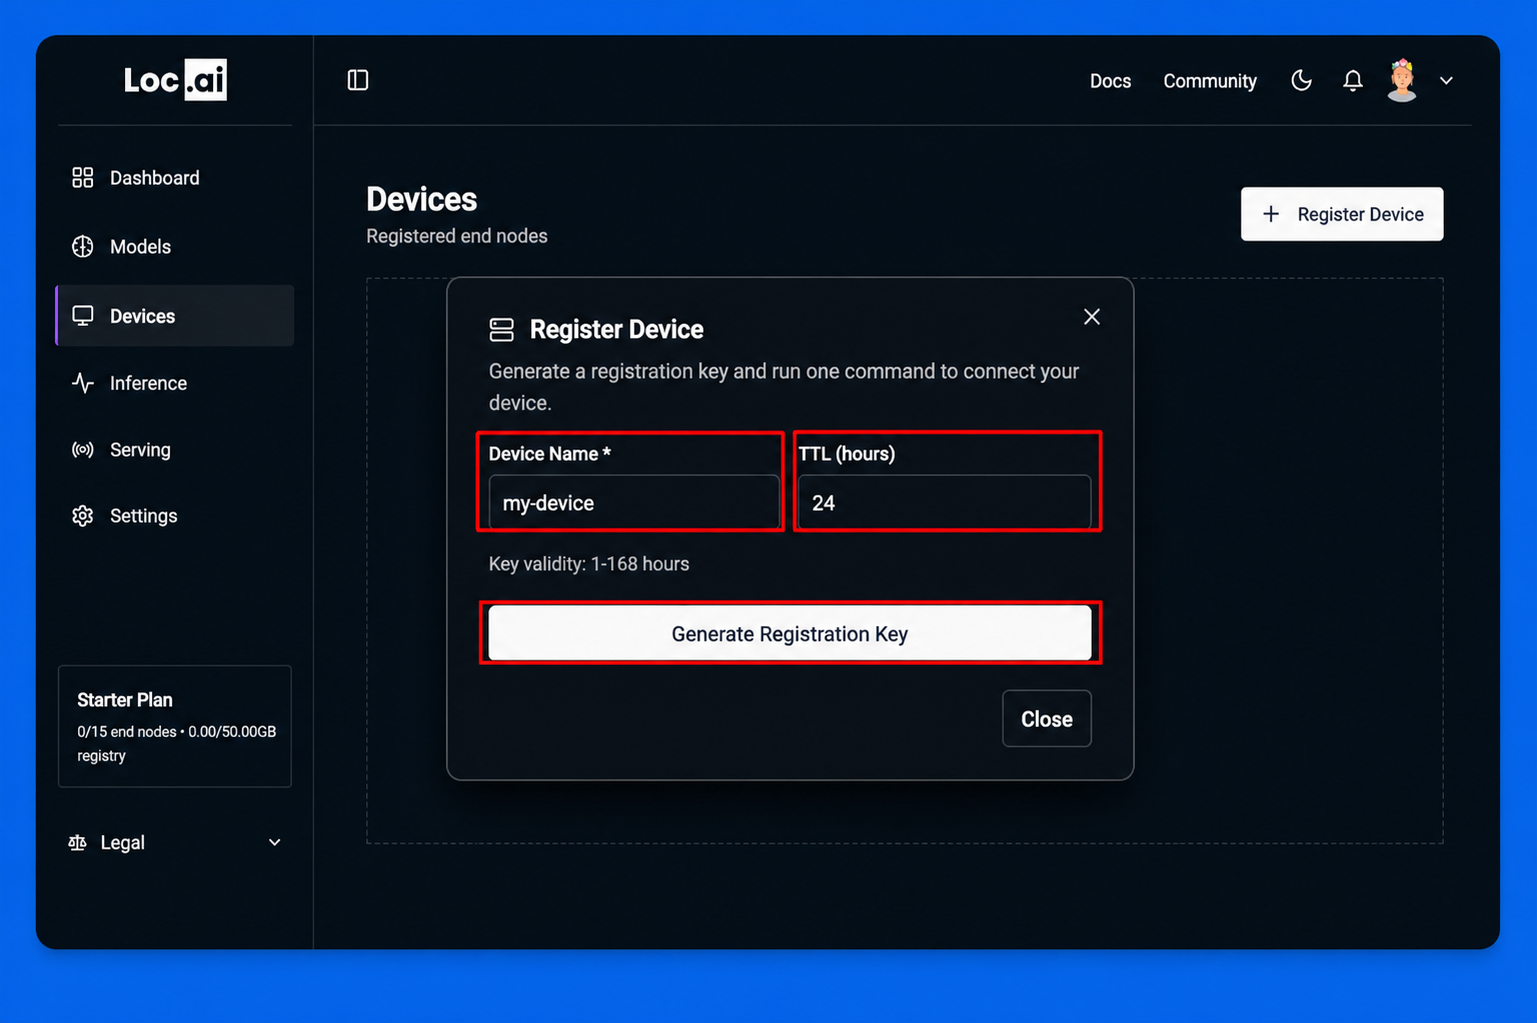
Step 3: A pop up will appear requiring you to enter a device details, such as device name, set the key validity period (TTL in hours), then click Generate Registration Key button to create the connection key for your device.
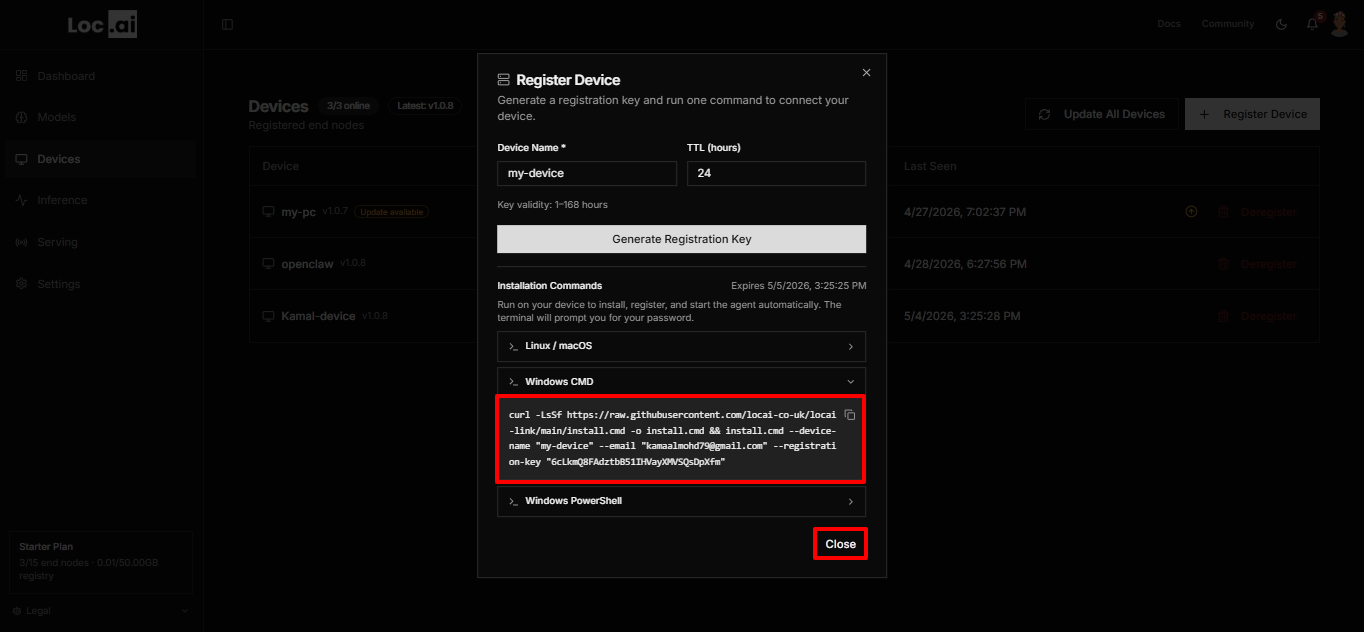
Step 4: Copy the generated installation command for your operating system, then click the Close button to exit the registration window.
The command you copied above must be pasted into the Terminal of the target device (the remote machine you are registering), not your local machine. Use Terminal on macOS or Linux, or Command Prompt or PowerShell on Windows.
Choose one of the two installation methods below. If you are unsure, use the One-line Installer.
One-line Installer
RecommendedThe fastest way to deploy — no manual setup required
Paste this command into the terminal of your remote machine. It will automatically:
- Install
uv(Python package manager) if not already present - Configure the Python environment and install all dependencies
- Register the device against the Loc.ai control plane
- Start the agent
- Linux / macOS
- Windows (CMD)
- Windows (PowerShell)
curl -sSL https://raw.githubusercontent.com/locai-co-uk/locai-link/main/install.sh \
  | bash -s -- \
    --device-name "my-edge-device-01" \
    --email "you@example.com" \
    --registration-key "YOUR_REG_KEY"
curl -LsSf --ssl-no-revoke https://raw.githubusercontent.com/locai-co-uk/locai-link/main/install.cmd ^
  -o install.cmd && install.cmd ^
  --device-name "my-edge-device-01" ^
  --email "you@example.com" ^
  --registration-key "YOUR_REG_KEY"
& ([scriptblock]::Create(
    (Invoke-RestMethod https://raw.githubusercontent.com/locai-co-uk/locai-link/main/install.ps1)
  )) `
  -DeviceName "my-edge-device-01" `
  -Email "you@example.com" `
  -RegistrationKey "YOUR_REG_KEY"
If you see a permissions error, allow script execution for the current session first:
Set-ExecutionPolicy -Scope Process -ExecutionPolicy Bypass
The command copied from the dashboard already contains your credentials. If you are typing it manually, replace --device-name, --email, and --registration-key with the values shown in your Loc.ai dashboard under Devices → Add Device.
Install from Source
AdvancedManual installation for development, customisation, or pinned versions
Use this method if you need to modify the agent code, contribute to development, audit the install steps, or target a specific tagged release. Run all commands on your remote machine.
1. Get the Code
Clone the repository and switch into its directory:
git clone https://github.com/locai-co-uk/locai-link.git && cd locai-link
Download the ZIP from the Latest release page, extract it, and cd into the extracted folder before continuing.
2. Set Up the Environment
Run the install script for a guided, wizard-like setup. This installs uv, creates a virtual environment, and installs all Python dependencies:
- Linux / macOS
- Windows (PowerShell)
chmod +x install.sh && ./install.sh
.\install.ps1
Alternatively, invoke the setup step directly via main.py:
# Standard setup
python3 main.py setup

# Recommended: use uv for faster, reproducible installs
uv run main.py setup
3. Register the Device
Register the remote machine using the key generated from the Loc.ai dashboard:
uv run main.py register \
  --device-name "my-edge-device-01" \
  --email "you@example.com" \
  --registration-key "YOUR_REG_KEY"
You will be prompted for your account password. To skip the prompt, supply a pre-obtained JWT:
uv run main.py register \
  --device-name "my-edge-device-01" \
  --email "you@example.com" \
  --registration-key "YOUR_REG_KEY" \
  --token "<YOUR_JWT>"
Replace register with activate and provide --device-id and --api-key instead of --registration-key:
uv run main.py activate \
  --device-id "EXISTING_DEVICE_ID" \
  --api-key "YOUR_API_KEY"
Add --api-url "<url>" when targeting a non-production control plane.
4. Run the Agent
Start the agent for the current terminal session:
uv run main.py run
To install it as a persistent background service (systemd on Linux, launchd on macOS, or a Windows Service), add --prod:
uv run main.py run --prod
On subsequent runs the agent resumes the saved session automatically and applies any over-the-air (OTA) updates via execv.
CLI Reference
| Command | Purpose |
|---|---|
main.py setup [--dev] [--tui] | Install Python dependencies. --dev adds mkdocs, pytest, and other dev tools. --tui adds the terminal UI package. |
main.py install [options] | Full install workflow in one step: clone → setup → register → run. |
main.py register [options] | Register a new device using a dashboard-generated key. |
main.py activate [options] | Reactivate an existing device using its device ID and API key. |
main.py run [--prod] | Start the agent. --prod installs it as a system service. Handles OTA updates via execv. |
main.py stop | Stop all running services, including locai-link and zenohd. |
main.py reset [--hard] | Clean the environment, virtual environment, and caches. --hard also removes session files. |
main.py install-plugin <name> | Install a plugin by name. |
main.py tui | Launch the text-based UI (requires the --tui extra). |
API Reference
API docs are generated from source docstrings via mkdocs + mkdocstrings (included in --dev extras):
uv run mkdocs serve    # Live-reload dev server at http://127.0.0.1:8000
uv run mkdocs build    # Build static site into ./site/
Narrative pages live under docs/; docs/reference/ auto-populates from src/link/ docstrings.
Directory Structure
src/link/    Application core — app/, components/, infra/, adapters/, config/, utils/
plugins/     Extensions: language_model, audio_transcriber, image_classifier, audio_classifier
configs/     Runtime configuration and session state
tests/       Unit tests (mocked, no external dependencies)
docs/        mkdocs source (see API Reference above)
Step 5: Wait for the installation and registration process to complete. When the message Pipeline 'command_center' started appears, the device is successfully connected and running.
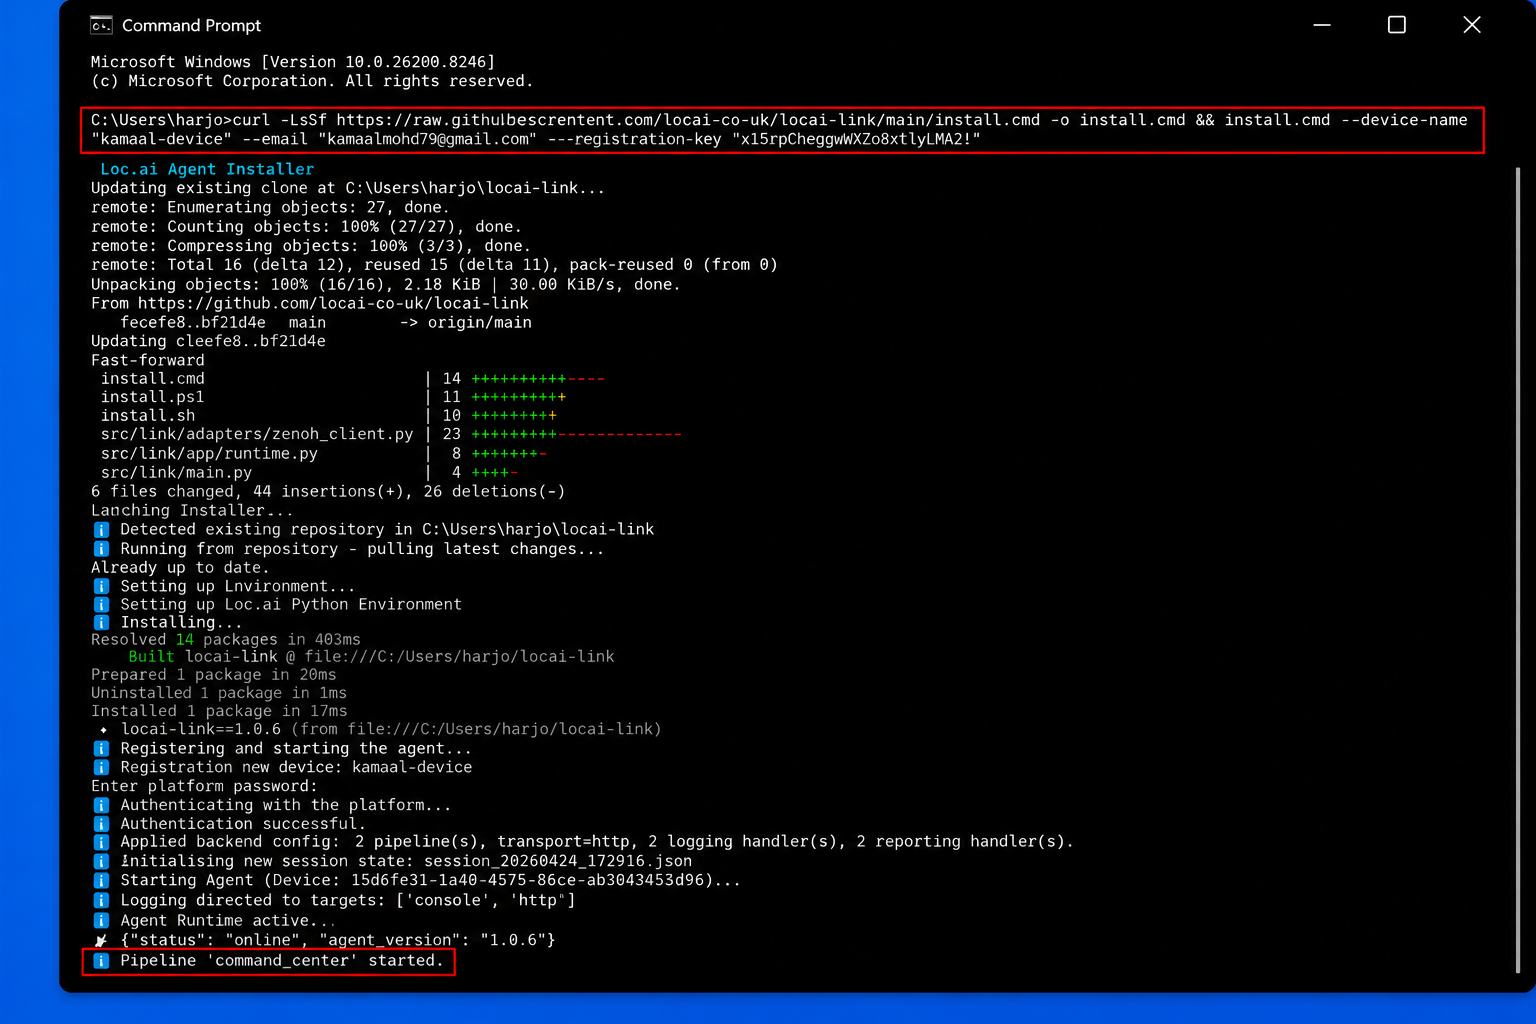
The terminal of the remote device should not be closed; it should keep running in the background.
Step 6: Open the Devices page to verify that your registered device appears in the list with an Online status, confirming it is successfully connected.
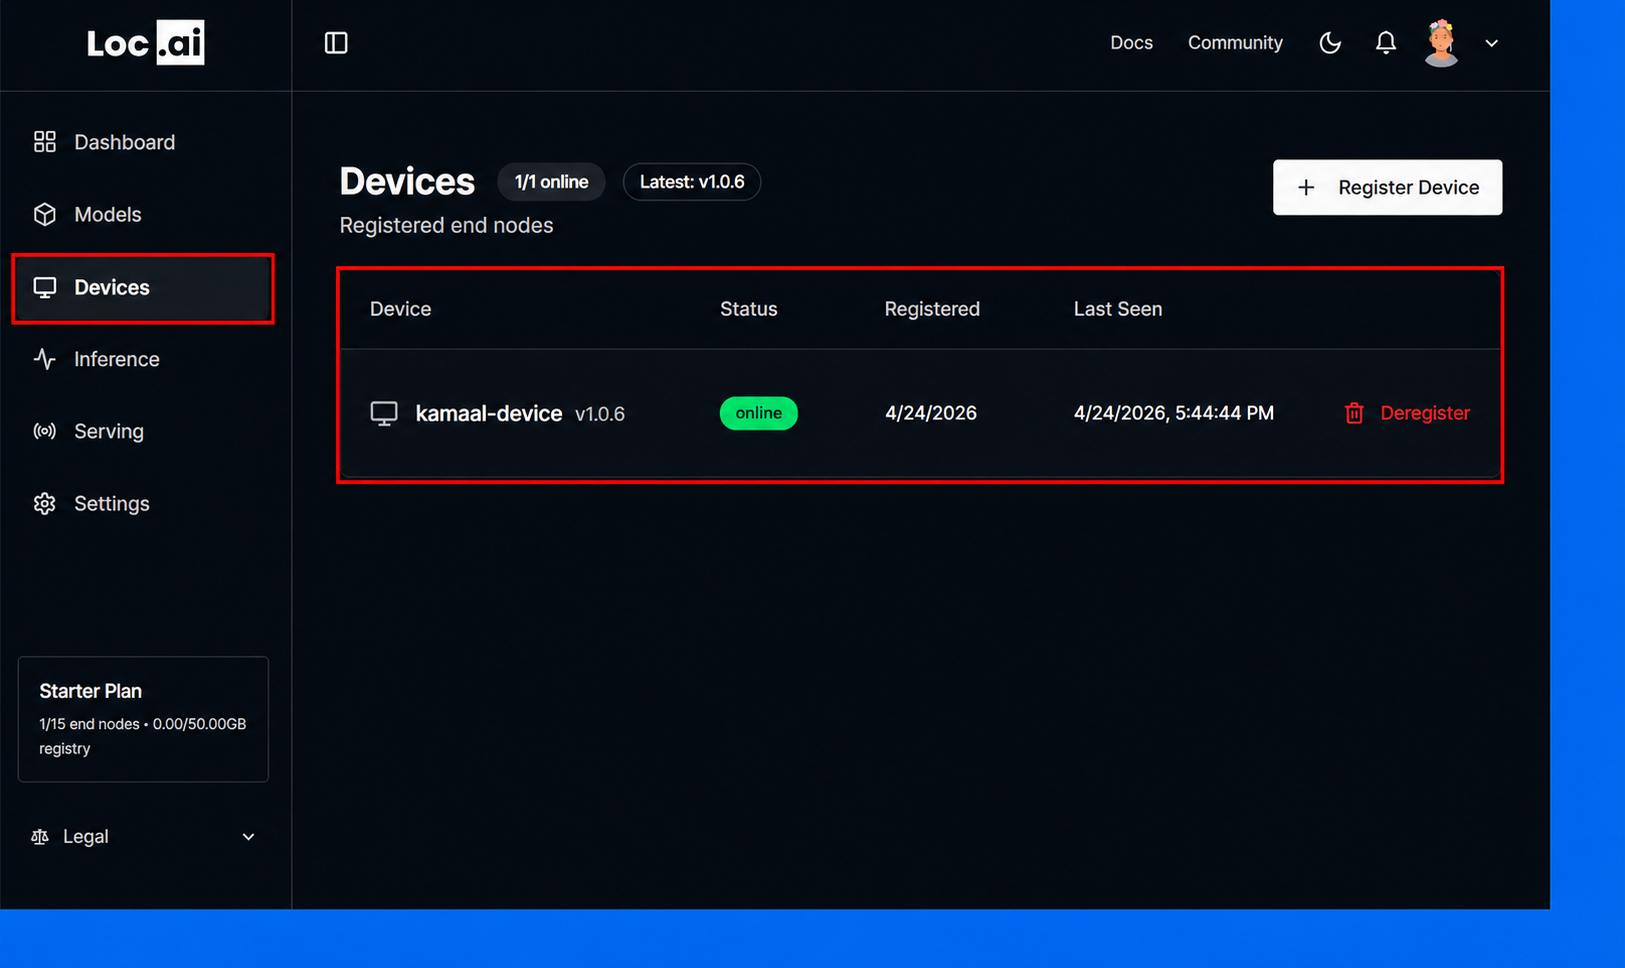
Now you can deploy a model.
Deregistering a Device
When you uninstall Locai Link from a device, Link automatically deregisters that device from Locai Control. You no longer need to manually remove devices from your Control dashboard after uninstalling: the device entry, its installed models, and its subscription slot are all cleaned up for you.
What happens when you uninstall Locai Link
- Model records are cleared. Any models that Link has already removed locally are reported to Control and removed from that device's model list.
- The device is deregistered. The device record is deleted from Control, freeing its slot in your subscription and updating your organisation's device count.
- Analytics are updated. Your total device count in Control reflects the removal immediately.
No action is required from you. If you open Control after uninstalling Link from a device, that device will no longer appear in your device list. Deregistration requires a connection to Control; if the device is offline at uninstall time, the entry may persist temporarily and you can remove it manually as below.
Manual deregistration (admin-initiated)
Administrators can still deregister a device manually from the Control dashboard at any time, for example if a device was wiped or is no longer reachable. The outcome is the same: the device record is removed and the subscription slot is freed.
- Sign in to Locai Control.
- Navigate to Devices in the left sidebar.
- Find the device you want to remove and click Deregister on its row.
- Confirm the action in the dialog that appears.
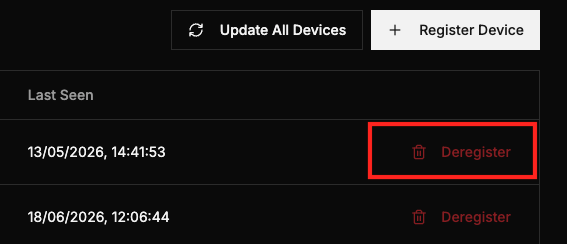
The device is removed and its subscription slot is freed immediately.
Safe to retry
If an uninstall is interrupted and the deregistration request is sent more than once, Control handles it gracefully: a repeated report for a model that is already absent is ignored safely, and a repeated deregistration for a device that has already been removed is treated by Link as confirmation that it already succeeded. You do not need to worry about stale or duplicate device entries resulting from a failed or retried uninstall.
Subscription slot and device count
When a device is deregistered, whether by uninstalling Link or by an admin action in Control, its subscription slot is released immediately. Your organisation's device count decreases accordingly. If you are on a solo plan, the single device slot becomes available for a new device straight away.
Frequently asked questions
Will my models be redeployed if I reinstall Link on the same device? After deregistration, the device has no record in Control. If you reinstall Link, it registers as a new device. You can then deploy models to it from the Control dashboard as normal.
What if I uninstall Link without an internet connection? Deregistration requires a connection to Control. If Link cannot reach Control at uninstall time, the device record may persist in your dashboard temporarily. You can remove it manually from the Devices page in Control.
Does deregistration delete my models from disk? No. Deregistration removes the device and model records from Control only. Any model files already downloaded to the device's local storage are managed by the Link uninstaller, not by Control.